Been a little while since I’ve been here in blogland but I’ve been asked for my method of binding quilts with angles other than 90degrees. There are a few ways to do this but this is my method and as always I do recommend that you try a few ways first before settling on the method that works best for you.
I also use a 3in wide binding rather than the usual 2.5in as I find when binding by machine it allows me a little more wiggle room.
So here we go –
Join your 3in binding strips end to end with 45-degree seams, then trim the seams and press them open. Press the binding strip in half lengthways with the wrong sides facing. With raw edges aligned and mitring the corners as you go, stitch the binding to the back of the quilt top, starting on a straight edge.
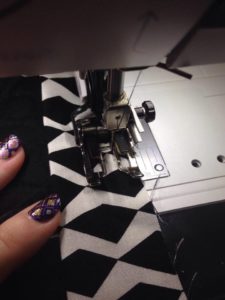
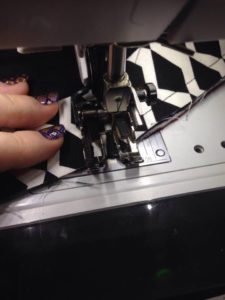
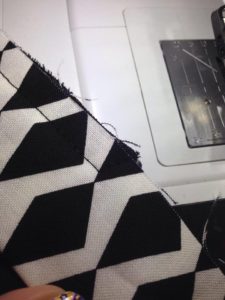
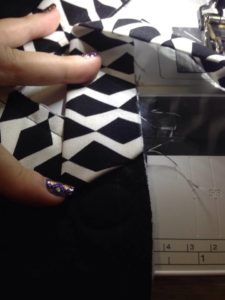
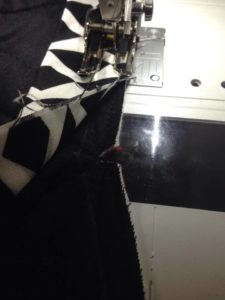
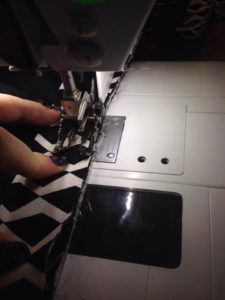
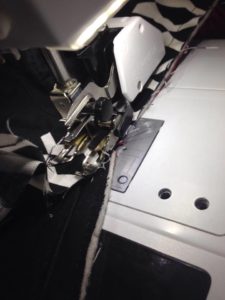
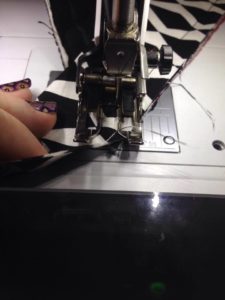
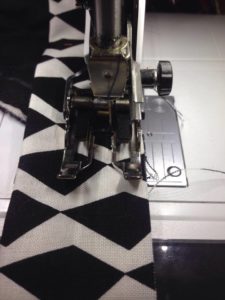
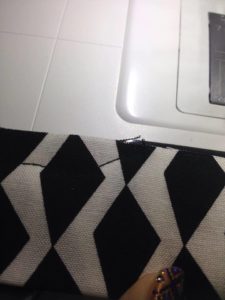
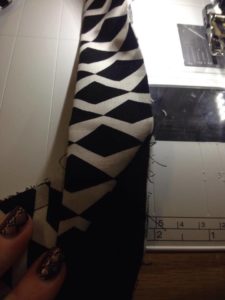
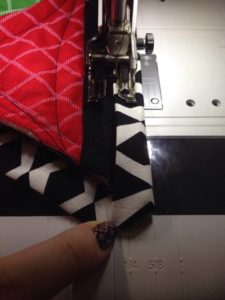
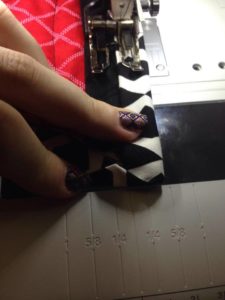
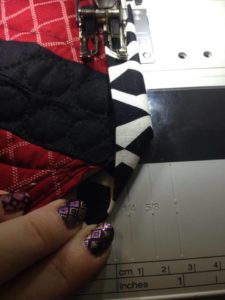
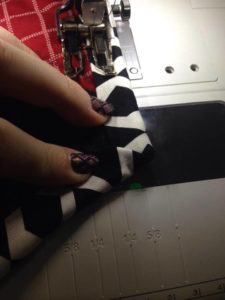
When you reach the 120degree corner, stop a 1/4in away from the edge, and then stitch off the edge of the quilt top stitching to the point (photos 1-3). Fold up the binding as shown in photo 4. Fold it back down aligned with the raw edge (photo 5) and continue sewing, repeat on each point that is 120 degrees.
Photo 1
Photo 2
Photo 3
Photo 4
Photo 5
When you reach a concave (facing inwards) angle, snip a 1/4in clipped notched into the quilt top (photo 6), angle the quilt top so you are sewing a straight line (photo 7 and 8). This is easing the binding into the angle.
Photo 6
Photo 7
Photo 8
When you reach the 60degree corner, stop a 1/4in away from the edge (photo 9), and then stitch off the edge of the quilt top stitching to the point (photos 10 and 11). Fold up the binding as shown in photo 12. Fold it back down aligned with the raw edge (photo 13) and continue sewing, using the techniques for each angle.
Photo 9
Photo 10
Photo 11
Photo 12
Photo 13
Trim the surplus backing and batting 3/8in from the stitch line, and then turn the binding to the front and topstitch it in place using photos 14 – 18 to finish the 60 and 120 degree corners.
Photo 14
Photo 15
Photo 16
Photo 17
Photo 18
Photos 14/15/16 showed how to roll the binding up to finish the 60-degree point.
Photos 17 and 18 show how to position and finish the 120-degree point.
If you have any questions or would like me to make a video of this method, please let me know in the comments or you can ring 0416 023 637 or email me at frankensteinsfabrics@hotmail.com
The other day I was fortunate enough to see this link that a friend (also a quilter) posted on her FB page.
I read it with interest, agreeing with some points, recognising that I could adjust my own view on others.
But one thing has struck me since reading this blog and that is if you piece a backing PLEASE piece it with the same care and attention to detail as you would the front.
Backing is important regardless of your view on it because it will be important to the overall finish of your quilt. Whether it gets professionally quilted on a long-arm or a DSM it doesn’t matter but how the backing sits is a key point in making sure your whole quilt looks its best.
I’ve often found there are several schools of thought on backing. I myself fall into the first category.
1. The ‘Match the backing’ club: This group wants the backing to match the front in some way. Using up the leftover fabrics from the front or matching it with another fabric altogether. This group often consists of Modern quilter’s with lovely pieced backings, those who like symmetry and those who like to use what they bought for that project.
2. The ‘it’s only backing’ club: This group seem to not worry about matching – theme, colour or style – they pick up cheap backings whenever they see it and whatever takes their fancy at the time a quilt is finished, it goes on as backing.
3. The ‘I’ll use something plain’ club: This group use primarily homespun, calico, quilter’s muslin or a very plain wide back. This group is rare. I hardly see any quilts like this anymore.
There is nothing wrong with any of the above ideas for backing. I’ve used all three types over the almost 300 things I’ve quilted over the last decade BUT the one thing that has been the same is that whenever I piece a backing it’s done with care.
Because a backing needs to be attached in a certain way to the ‘leaders’ (the fabric attached to the roll bars on a long-arm frame) it needs to be as accurate as you can make it. As a quilter I have seen many backings – some have come to me off the roll, some cut to size and some pieced – off the roll is best for less changes to the nature of the fabric as I can pin the straight selvedge to the top leader and adjust the bottom one as necessary. Cut to size is problematic as cutting it to size often results in too small, or it shifts during quilting and then one side has less, the bottom doesn’t make it all the way, corners are way off…. Pieced backings cause issue, because lets face it a seam creates a weak spot – seams undo themselves, seams might not be straight and seams may have been stitched incorrectly causing rippling.
So in order to solve these problems –
1. Off the roll: Where you can, leave a selvedge for the top edge of your backing. Talk to your quilter about it and if needed mark it as the top of your backing.
2. Cut to size: Backing for many long-arm quilters needs to be at the barest minimum 4in extra ALL the way around a quilt top size. This is mentioned in the link above. I would say 6in to be safer and 8in if you are getting dense quilting done. Please don’t cut backing ‘to size’ because it just won’t do. If you intend on machine quilting on your own domestic machine then cutting to size can be preferable as it reduces bulk BUT if you change your mind and want it quilted on a long-arm please piece some extra around your backing – an extra strip of homespun, or the like to help us get your quilt onto the machine – or rethink your backing altogether and start again.
3. Pieced backings: Lay your quilt top out flat and measure it. Use those measurements and then add your 4-8in all the way around. Draw up on graph paper your backing dimensions and then work out your piecing from the outside edge in. (Craftsy have a really good class on modern quilt backings with Elizabeth Hartman called Creative Quilt Backs, this may help with your backings if you have trouble). Piece your backing together as carefully as you would the front, taking the time to press as you go and run a row of stitching all the way around the edge of the backing to prevent seams unravelling. Use starch if you like and make sure all threads are trimmed away. Above all don’t rush, I know it’s exciting being nearly done or nearly ready to quilt but don’t rush your backing.
If you are sending your quilt away to be quilted make sure everything is pressed, trimmed and stitched securely so that it can handle any jostling while it travels to the along-arm quilter. Be clear with what you want for your quilt, discuss your options with the quilter and make sure you get anything you need in writing. I use an invoice book when I’m booking in a quilt, I write down the size, price, batting, backing, thread, design and due date (timeframe if the quilt is needed by a certain date: birthday etc). My customers pay a deposit and then the balance when the quilt is picked up. So the deposit amount and date is also included on the paperwork. Other things that we quilters look for when booking in your quilts are things like – do you want the quilt trimmed down ready for binding, do you want us to attach the binding, make the binding, are there labels that need to be quilted on as well?
There’s many things that need to be thought about in the process of making a quilt but if you trust in your long-arm quilter, their experience and talent you will have a finished quilt to be very proud of.
If you would like to know more about long-arm quilting you can check out the machine quilting page, email me frankensteinsfabrics@hotmail.com, ring 0416 023 637 or comment on this post.
Watch this quick video to see the machine in action