So this quilt-along will be a little different to your usual type of quilting instructions. Mainly because I’m letting Mum take the lead on this one. It’s her quilt and her learning pace, so there’s no rushing and no set timeframe.
Mum works from home for the most part of the week, working in our shared space, the craft room/office. As it’s on the top floor of the house it does get a bit warm but when the sun is around the back of the house first thing in the morning it is quite chilly. Mum decided she wanted to try and make a quilt for herself. Something small enough that she can give it a go without being too overwhelmed with its size, but big enough to drape over her legs while she works on the computer.
So the other night while we watched CSI (Saturday Crime Night) we pulled out every piece of fabric that Mum owns. Which was not a lot as she’s not really a sewer to the extent I am (read craft hoarder), she used to dabble when my sister and I were little but she mainly painted ceramics and now does cake decorating and some knitting.
Having helped quilters choose fabrics for almost a decade I have created my own process when working with customers who struggle with fabric choice – getting them to tell me little things about the fabrics they’ve chosen so I can work my way through their selections and help nudge them in the right direction – whether that direction be a complete selection or a partial one with more things to find later – and then get the fabrics to speak its design to us.
So Mum’s fabrics were a bit random to say the least. She had a few themes which she’s picked up on but generally it wasn’t a cohesive group of fabrics. We started by dividing them into what groups we could see – blenders, black and whites, brights, small prints (mainly tone-on-tones) and miscellaneous. We also matched up fabrics that worked together, hoping that as we worked through the pile we would find something or enough little somethings that would spark an idea.
Once everything was sorted we stepped back and looked at what we’d done. Mum couldn’t quite see where I was going, she wasn’t really even clear with herself about what she wanted and was concerned that her random fabric purchases and mini raids on my stash had left her with a pile that couldn’t be used.
Which is never the case. Because stash diving gives you the opportunity to see what you have (and how much of it), which means you can then either use what you have buying only a few bits to add in or you can see you have nothing that works and buy from scratch. Both are equally good but it all boils down to the timing, the project and your budget.
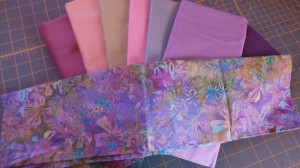
So I made her pick up the two fabrics that spoke to her the most and explain why they spoke to her.
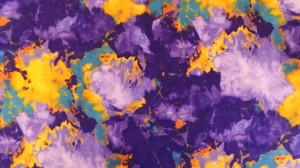
The first one she finds calming, the softer colour palette is peaceful and contains her favourite colours. It’s not too bold but it’s still an interesting print.
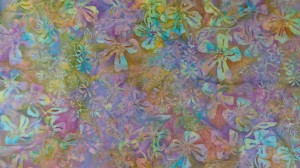
The second one reminds her of a storm – the turbulent nature of it, the depth of colours in it and the movement in the print. She loves the strength in the colours but was concerned about matching them.
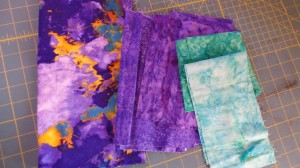
So we went through the shop’s stock, our local Spotlight and my stash. After trying to match the storm print and coming up with very little that Mum felt matched the vibrancy of the fabric, we ended up with the batik fat quarter and a handful of soft homespuns in matching tones.
The design of the quilt also went through several permutations. Starting with the fact that Mum didn’t want to chop up the fat quarter too much and lose the impact of it. We sketched a few ideas, thinking that we were using the storm print. Mum thought about creating a window effect so that we’d be looking out the window at the storm – cutting it up into four squares to make the window panes – but then we were a tad trapped with that design, not having fabric to see how we could expand on the quilt into the border made it difficult. We thought about doing a colour wash – pulling the four main colours from the storm FQ and working with colour gradation, piecing blocks to surround the FQ, possibly edging it with a narrow border of black to frame it and contrast with it, but it all felt a little off so we changed plans. Again.
Because homespuns are a flat, solid colour you don’t want to use them as a large expanse (unless you plan on machine quilting it with detail, like many Modern quilters do), so for Mum’s quilt we decided on strip piecing blocks and as yet we have yet to decide on the width of the strips and in what direction they will go for each block.
Mum’s quilt is a simple layout. The FQ in the centre, trimmed to a square, with a narrow sashing, the 12 pieced blocks surrounding it, a second sashing and then a border.
Materials list for those who’d like to quilt along:
One feature fat quarter – a print that you can pull the other fabrics from
50cm each of 5 co-ordinating fabrics
2.5m of your border fabric (50cm of this will potentially go with the other five 50cm pieces)
60cm of your binding fabric (we have 4 FQs of this colour for Mum’s quilt)
Backing: will be pieced from remaining fabrics with anything extra needed purchased when we get to that stage
Wadding: this quilt’s estimated size will finish at 1.5m square so you can either purchase a 1.7m square of backing (enough for professional quilting needs) or make up a piece using any scraps of wadding you have in your stash.
Tools:
Sewing machine with 1/4in and walking feet
Rotary cutter, ruler and cutting mat
Neutral thread for piecing
General sewing supplies: pins, scissors, marking pens etc
Note: Mum and I have over estimated on fabrics as I roughly calculated she needed about 30cm of each. As we were buying homespun which is generally anywhere from $5 – $10 per metre it was a more economical way to purchase for this particular quilt. If you would like more accurate quantities please hold off on your purchasing until the next post.
So now that we have all the fabrics and the design set what’s next?
Wash all your fabrics. I’ve discussed this before in this post and this is the only part of this whole process where it is up to you.
Then iron and if you like starch them to return them to pre-washed condition which makes for easier cutting. Purchase starch here.
Note: When you wash fabrics there will be fraying. You will lose some off your edges and be required to straighten them cutting into the amount of fabric needed for your quilt. BUY extra if you feel you will lose too much – 5cm extra purchased can save a whole heap of grief when cutting after washing. This is also spoken about in the washing blog post.
Once you have everything washed and ironed and ready to go meet back here for the second instalment of Quilting Along with Mum.
If you have any questions – such as fabrics choice issues – please feel free to post a photo or video of your dilemma and I’ll help you with that part of the process. You can also email me frankensteinsfabrics@hotmail.com.
Marni x