It not only has my favourite holiday Halloween but is also the birthday of the shop and this year for the shop’s third birthday I’ll be doing all sorts of wonderful things to celebrate.
Firstly there will be the ongoing competition.
To enter all you need to do is place a mail order (or orders) during the month of October. For every $5 you spend you will receive a numbered ticket. At the end of the month everyone’s numbers will go in my lucky witches hat and I will draw out a winner.
The prize: a $50 gift voucher to spend on fabrics (or it could go towards quilting costs if you prefer), a blue size 16 singlet top that has a screen printed black bat on it that I made in my screen printing class in September and some of my quilt patterns.
I will also be doing an overhaul on the store section of the website – this is more from an inventory standpoint so that all future sales are easier to track. There will be a heap of quilts listed on my hand-made store, all ready to be posted and perfect for Christmas gifts.
We’ve also passed 1000 likes of FB and 100 followers on IG so I’l be doing a little something to celebrate those.
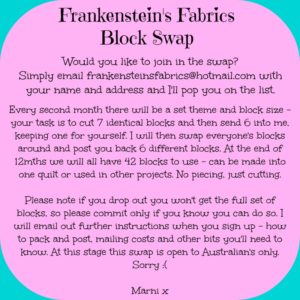
Also if you would like to join in my fabric swap please drop me an email – frankensteinsfabrics@hotmail.com. The cut off date for sign ups was today but life go out of hand so I’m extending it for October.
There will be more details on the competition as well as a picture or two of the singlet top and the patterns etc so stay tuned!
I’ve been busy the past few months catching up on life and things in order to make sure that as we hurtle towards the end of the year and Christmas everything runs nice and smoothly. 😀
So…
Custom quilt orders will be cut off as of midnight the 5th of October. There are 2 spaces available between now and Christmas.
Custom orders for other items (cushions, runners, placemats, hair accessories, aprons etc) will be cut off mid-November to ensure Christmas delivery.
Machine quilting will be cut off on the 8th of December with the last day for quilt returns being the 19th of December. There are spaces available just contact me to find out more.
I am in the process of looking for a suitable venue with dates and times for some basics classes (understanding your machine, patchwork basics, patchwork patterns and binding). If you would like to be popped on a mailing list for class information please email me: frankensteinsfabrics@hotmail.com
Since moving the shop I’ve found myself rather low on space. It’s always been at a premium but now it’s top priority.
SO
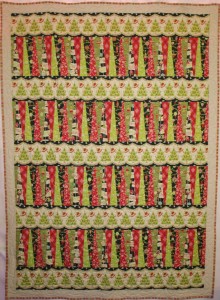
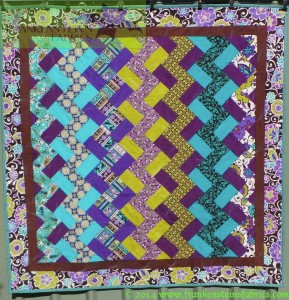
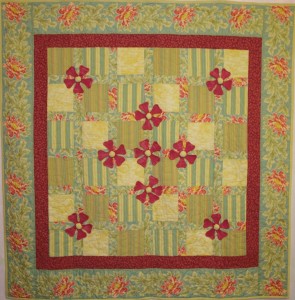
I’m having a massive quilt sale on all the pre-made quilts that I have ready to post.
The quilts are all listed here in a Facebook album and to purchase all you need to do is comment SOLD and message me your email and postal details and choice of payment method (Paypal invoice, credit card over the phone or direct deposit).
There is an assortment of quilts from cot size, to double bed along with a few wallhangings and table runners AND they are all 50% OFF!!
I want these quilts to go to good homes that will use them, throw them on the floor, on the lounge, use them as a picnic rug or even buy one for your favourite furry friend. I put a lot of work into them and I want people to enjoy them as much as I enjoy making them. 🙂
These quilts (with a few exceptions) are ready to post now – you purchase it and I’ll pop it in the mail. These quilts have been made over the past few years, some as recently as a month or so ago.
A few pictures below of some of what’s available.
As I unpack I will load more quilt pictures of what I have available.
And as always if you see something you like but it’s not in your colours or theme I can make a custom order quilt for you. Just get in touch with your ideas. 😀
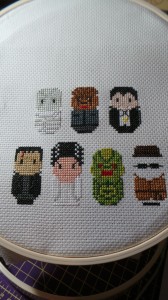
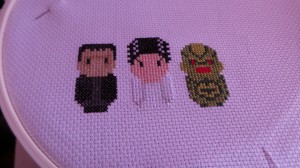
I finally finished my Classic Horror Monster cross-stitch!!
I’m really bad at finishing cross-stitches so this is a personal best for me…all in the one year!
Top Row: The Mummy, Wolfman, Dracula
Bottom Row: Frankenstein’s Monster, The Bride of Frankenstein, The Creature from the Black Lagoon, The Invisible Man.
I’ve also been working on some English Paper Piecing. I’m doing some clamshells at the moment and also working on a video for hexagons.
This quilt – that this first clamshell block will go into – will take me a while, as I am determined to do it by hand as you are meant to and I’m a very slow hand sewer. If you’d like to follow along just bookmark this post, but I’m warning you now that it will be ages in between updates, I’m that slow a hand sewer.
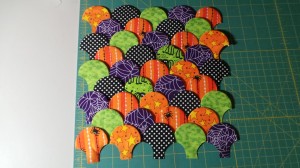
I’ll be using up all of my halloween scraps as I love the vibrant colours and I hate waste. And a girl can never have too many halloween quilts. 🙂
As of tomorrow the shop move goes into full swing so there might not be a post for a little while. Excited to have this all over with as I hate packing.
I have several sales happening as well at the moment – you’ll need to check out my Facebook page and Hand-made store for all the goodies.
So nearly at the middle of the year, tax time, 6 months till the end of the year and time to reassess what I’m doing.
At the start of the year I made myself a resolution to finish UFOs. I have done a few, not as many quilts as I would have liked but I have also made inroads to finish other UFOs – runners, bags and other craft stuff that I’ve been working on….
I’m doing a Classic Horror Movie Monster cross-stitch from Cloudsfactory that I bought ages ago but have done barely any on. I’ve done Frankenstein’s monster, the Bride and the creature from the Black Lagoon, next is the Invisible Man, then Dracula, Wolfman and the Mummy. I can’t wait until it’s finished and I can get it framed.
I love cross-stitch but I’m really slow to get things finished – handwork is really not my forté so it takes me three times as long to do.
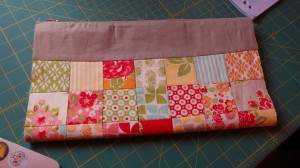
I’ve also been working on using pre-cuts to make a few items. I collect pre-cuts like most quilters do, you pick one up at a show or on sale and it sits in a box or the bag it came in and gets forgotten because you don’t know what to do with it or you struggle with the limitations of the size that its been cut at. I have a jelly roll sitting waiting for me but the project I’m saving that for is something that some friends and I are working on. The other pre-cuts I love at the moment are the mini charm square packs – 42, 2.5in squares – I’ve made a few things with them, but because they are so small its hard to keep coming up with ideas. This is the zippered pouch I’m doing today.
I’m also working on new quilt. I spotted a wreath on Pinterest sometime last year and it was lovely and soft grey tones with brighter peach flowers on it. I loved the colour combination so much I decided that I wanted to make a quilt in those colours. I did start this quilt last year but it has sat in a bag since as I got distracted by other projects. Yesterday I sat and pieced almost all of it and it will be on the quilting machine next week. I’m really looking forward to free-motion quilting something gorgeous in those wide spans of grey linen. YUM!
The move is going well. The new space is nearly cleared out and I’m still packing over at the studio. I’m aiming to be out by the end of the month but it is a little flexible. I really don’t want to muck around with moving as it is such a painful process but it is good in a way because it forces you to declutter and clean things out that you’ve left on shelves and in boxes for far too long.
I’m really looking forward to the new space as it means I can work more to my body’s natural hours. I’m a night owl, its well known that I’m no good in the mornings… 🙂 and because of the new space I am able to teach small classes. Nothing just yet, after mid-July when I’m all sorted, but you can book in now – just email or ring me.
Colour Class – 1.5 hours, $15.
Binding Class – 2 hours, $20, learn several types of binding.
Cutting and Piecing Class – 3 hours, $30, learn about all the tools needed for cutting, how to calculate and cut, then how to piece, press and iron.
Basic Pouch Class – 2 hours, $20, includes inserting a zip.
Basic Table Runner – 3 hours, $30, learn to design and piece a basic runner for your table.
I am located in Gosford so classes are intended for locals or those traveling through the Central Coast. If you are interstate please don’t worry as I can do video classes for you – please PM me if you are interested in those. I’m taking bookings now so if you’d like to secure your place please let me know and I will organise an invoice for a $10 deposit.
Anyways, its another wet and miserable day here on the coast so I’m off to make another cup of tea and get back to my sewing.
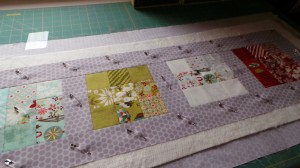
I’ve made this Christmas Table Runner using only a mini charm square pack and just over half a metre of Riley Blake Honeycomb Dot in grey (available in the store).
I know so many people who pick up pre-cuts thinking that they will make something from them, but inevitably they end up in a box or cupboard and don’t see the light of day for a very long time. I know it happens, I’m guilty of it myself. But this year one of my resolutions was to FINISH things and so in an effort to help you out there in quilt-blog-land finish things as well…here we go…
Materials
Aspen Frost mini charm square pack (42, 2 1/2in squares)
To start there’s a few little things that I need to make sure you know so we are all on the same page.
We will not be washing these fabrics. Pre-cuts don’t take well to pre-washing and you will lose more of a 2 1/2in square in fraying than you will have left to sew.
There will be minimal left overs as we will have scraps of the grey and a handful of squares that you won’t use.
Starch is optional but recommended. Starch will help your tiny pre-cuts retain what stability they have and will make your finished blocks easier to handle. Starch washes out. Starch recommendation is Mary Ellen’s Best Press, which you can purchase here.
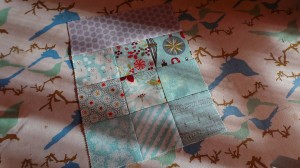
If you have trouble remembering a layout sequence, make sure you have your camera nearby. Snap a quick picture of the blocks once you are happy with the design so you can refer back to it if needed when you start piecing.
The techniques used in this tutorial can apply to any quilted project you just need to adjust your measurements and design as needed.
Preparation
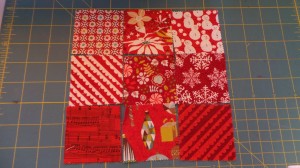
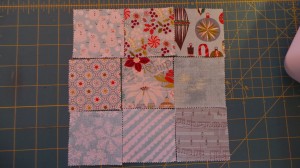
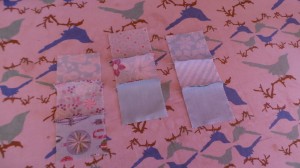
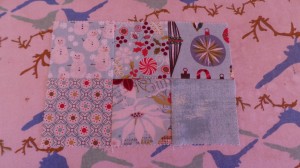
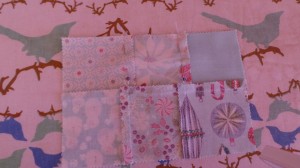
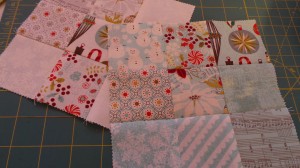
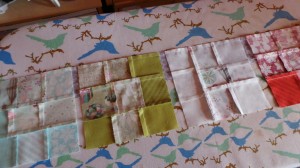
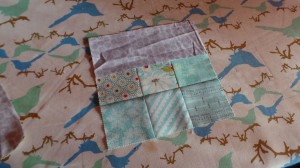
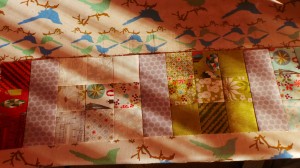
From your mini charm square pack select four lots of nine sets of squares. From the Aspen Frost pack I was able to refine my choice by colour – red, green, blue and white – but whatever pack you have you need to make that judgment call. It could be by print, scale, theme, directionality* etc.
Layout your nine squares in a 3×3 block that you like. Take a photo for reference if needed. See note 5.
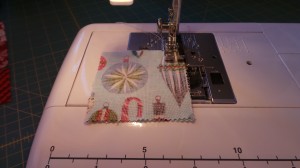
Thread up your machine with neutral colour thread (cream, white, black, grey) and your 1/4in foot. Set the machine for straight sewing, with average stitch length and width. My Janome likes a stitch width of just over 5 and a length of 2.
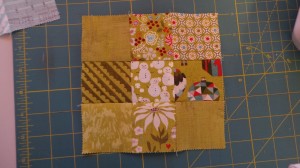
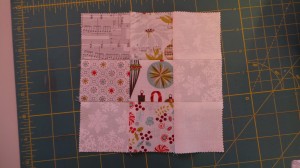
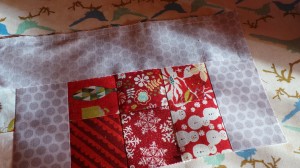
9-Patch Blocks
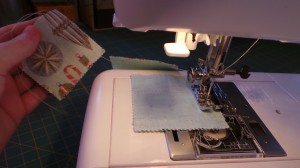
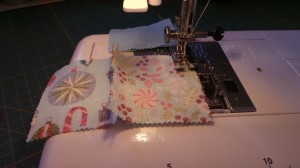
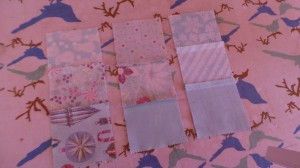
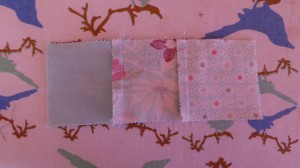
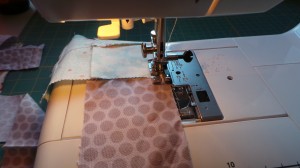
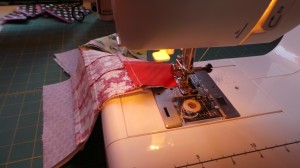
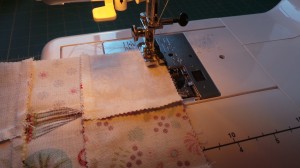
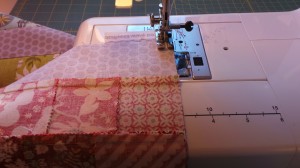
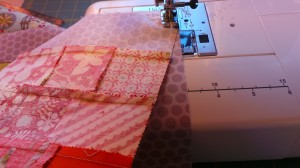
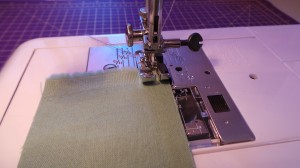
Take two of the mini charm squares and place them right sides together. Stitch the squares together down one side. Without taking the stitched squares off the machine continue piecing all the pairs of squares that you can from each block (this is where the photos of the blocks will help). Once you have stitched the pairs (12 pairs) you can remove the strand of pairs off the machine. This is called chain piecing** and saves time and thread.
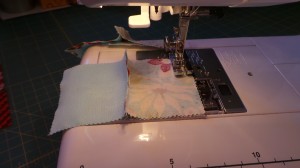
Starting with the first of the stitched pairs go along and add the third square for that row.
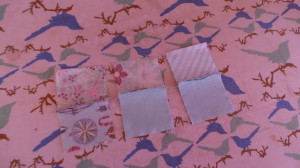
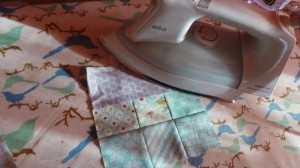
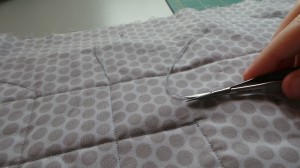
Once you have joined the rows of three squares, take everything over to your ironing board, bring your scissors or thread snips.
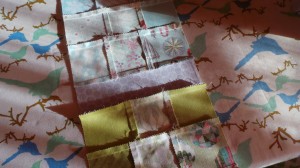
Snip the threads holding each row together. Set the three rows for one block face down on the ironing board. Check that you have them in the right order (use your photos) and press the seams in alternating directions.
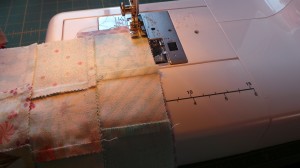
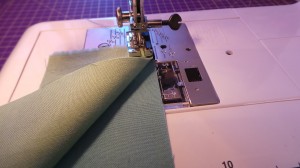
Taking two rows align the seams as shown. This is called abutting*** the seams and will ensure that you have better matching points. This technique can be used anytime you have two seams meeting.
Pin the two rows together making sure you have the seams matching.
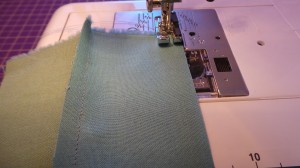
Stitch along the edge, remove the pins and check you intersecting seams. Press the rows open and then repeat the process for the third row of that block.
Assemble all 4 of your 9-Patch blocks.
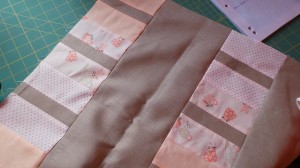
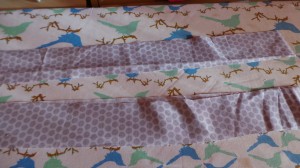
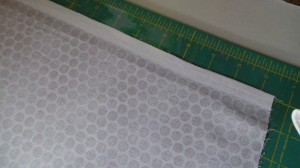
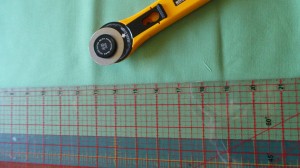
From your 55cm of grey fabric cut three, 2 1/2in strips.
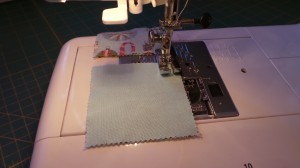
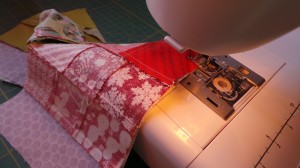
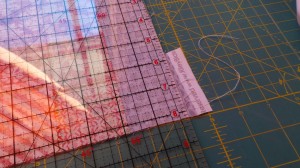
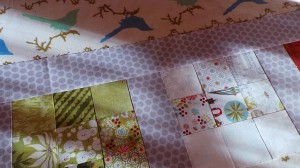
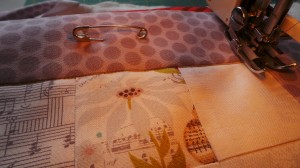
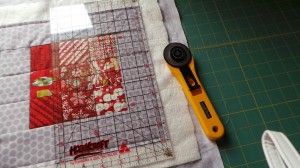
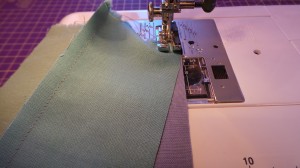
Place your 9-patch block right side down on the right side of one grey strip and stitch along the edge. Attach all four blocks onto the strip in this way
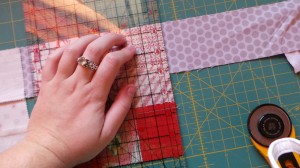
Place the pieced strip down on your cutting mat as shown in the picture and trim the blocks/strip down to size.
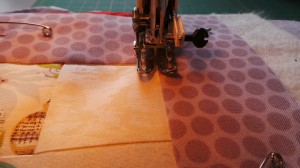
At this point I like to spray starch my blocks to aid in keeping them straight and neat, it also helps press out the strips that I’ve just attached to the centre blocks.
Set the seams and then press the strip away from the block.
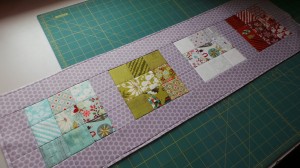
Layout your blocks in the order you want them in.
Piece the blocks together making sure there is a strip of grey in between each block. You can piece one by one or piece in pairs and then piece the pairs together.
Make sure you have a strip of grey on either end of your table runner length as well.
Trim down any excess grey fabric and press the seams you just stitched in towards the grey strips. Turn the runner over and press from the front to make sure there are no pleats in your seams.
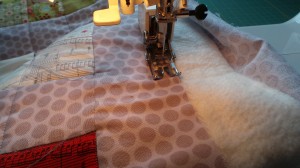
Take one of the remaining grey strips and place it right sides together with your runner, and stitch along the length. Pin if you feel you need to.
Trim the excess fabric strip and then set the seam.
Starch the strip and then press it away from the centre of your runner.
Repeat for the other grey strip and your runner top is finished!
Basting
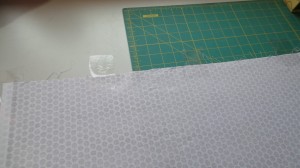
Press your remaining grey fabric (approx. 35cm). Starch if you like.
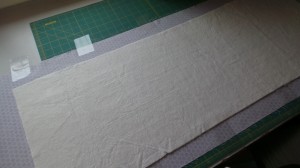
Lay the fabric right side down on a flat surface. Tape the selvedge edges down and then tape at intervals along the length, making sure the fabric is taut but not stretched.
Lay your rectangle of wadding on top of the fabric and smooth out so its flat and there are no lumps, wrinkles or loose threads.
Place your table runner right side up on the wadding and smooth from the centre out so there are no lumps or folds.
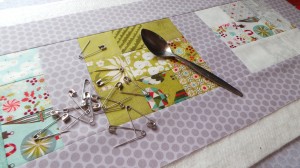
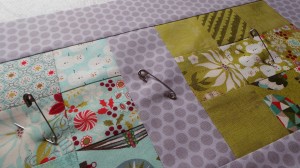
Pin baste with safety pins, no more than 4in apart. If the pins hurt your hands to close them – use a teaspoon.
Set your sewing machine up with your walking foot. You can increase your stitch length slightly, I tend not to but it does make it harder to unpick if you have a small stitch when quilting. Test a few sizes to find one you like.
Quilting
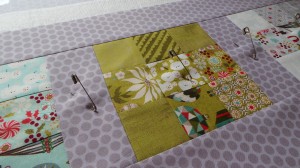
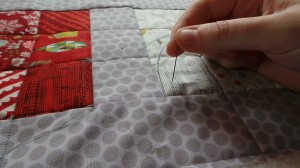
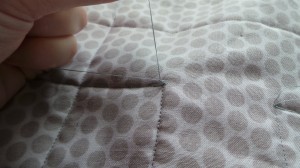
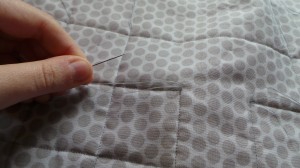
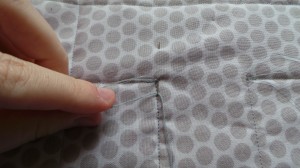
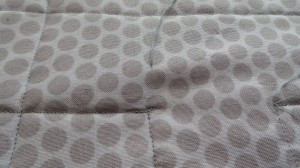
I quilted this runner in straight lines – ditch stitching in each of the 9-Patch blocks and then ditch stitching the rows and extending it out onto the border. I also did a 1/4in stitch away from the edge of the border to secure the whole runner edge to make binding easier.
To tie in the loose thread ends – from the top of the runner thread the ends onto a needle and pull through to the back of the runner. Tie the threads in a knot and let the knot sit about 1/8th of an inch away from the runner surface. Thread all four threads on to the needle and thread into the runner and away from the stitches, hiding the threads and the knot inside the runner. Wiggle the knot so that it slips under the fabric, if you need to. Clip off the excess thread.
Trim down your backing and wadding to the edge of the table runner and you are ready for binding.
Scale: The size of the print – small, medium, large.
Print: Floral, dots, stripes, scrolls etc
Directionality: Stripes, text, arrows
**Chain piecing
Piecing by means of continuing to sew without stopping. Piecing everything that needs piecing before you need to stop and press, cut or attach the next section
***Abutting the seams
Also known as nesting the seams. Making sure that the folded part of each seams is ‘butted’ up to the next seam so that they sit as flat as possible and reduce bulk.
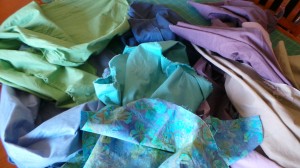
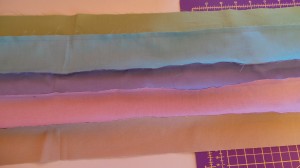
After washing all of your fabrics, iron and starch them.
This is how much fraying and threads that happened when we washed these homespuns, we lost just under 3/4in on this green fabric and the others lost about the same but none more than an inch. This is why I urge you to consider buying extra fabric to save you the grief and hassle of going back and buying more fabric.
Watch this video for using starch.
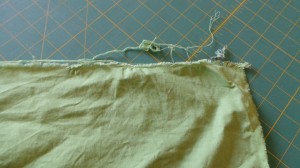
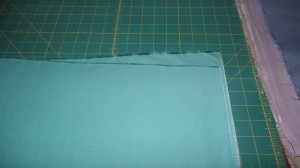
Fold your fabrics in half with wrong sides together, selvedges aligned. You may need to allow the fabric to dictate to you where the fold is, which may pull the selvedges out of line but they will be cut off so don’t worry too much. Your selvedges will not match up – in the photo below you can see the teal fabric selvedges are way off – this is due to two things, washing and grain line. When we washed our fabrics they have shrunk, we removed the sizing that was keeping them nice for the shelves in the shop and the grain line has been ‘relaxed’. By adjusting the position of the selvedge when folding your fabric in half for cutting you will get a much better and more natural grain line and it will be straighter.
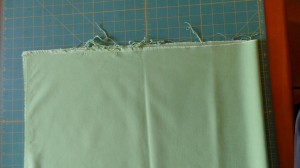
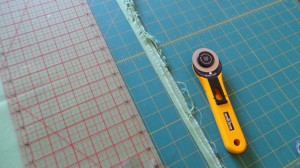
Trim off the frayed edge to straighten up the fabric. If you are left-handed you can continue cutting as the fabric is laid out in the right position for you. Right-handers turn the fabric’s newly straight edge to the left-hand side of your board and then continue cutting.
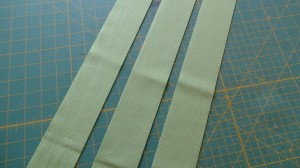
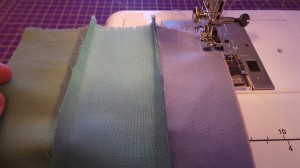
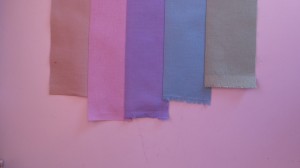
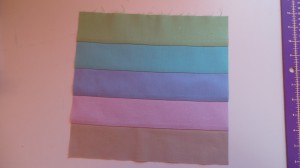
From your five fabrics (50cm pieces of homespun in the materials list) cut three 2 1/2in strips.
Note: the remaining fabric will be used to piece the backing for Mum’s quilt, you can choose to do the same if you wish.
Set up your sewing machine with the neutral thread for piecing, the 1/4in foot and a straight stitch that is the average for your machine – check your manual for tips on this. My Janome likes a stitch width of 5.5 and a length of 2.
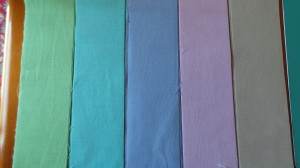
Piece the strips together in the sequence of your choice. This is the sequence we have chosen for mum. There is reason behind it, it’s not just random. If you paint put your mind into that way of thinking, but I will explain.
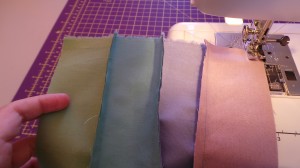
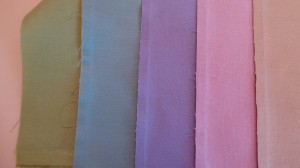
1. Green is on this end because it has a yellow base colour and is essentially the odd one out in this range of colours.
2. Teal is next because it is made up of blue and green so it can sit nicely next to green to help tie it into the block.
3. The blue is in the middle as it is the darkest fabric and will draw the eye in, but it is also there because it is blue – the teal has blue in it so they can sit next to each other, and the blue also is used in making the colour for the next strip so it is tying the two sides of this block together.
4. Purple has a red base (mix red and blue together to make purple) and so this is why it’s next to the blue.
5. Brown is often classed as a red based colour so it belongs next to the purple for this reason. It is also technically an odd one out so it is also balancing the green’s oddness on the other side.
Piecing
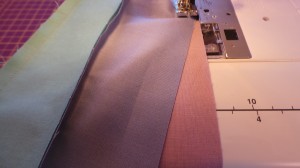
Start with the green strip and place it on top of the teal strip. Pin if you feel you need to hold the strips together.
Note: I like to sew my strips together so that as they are being joined so that they are off to the left side of the machine – this keeps them out of the way and doesn’t clutter up the throat of the machine. I am right-handed, as is mum. Left-handers may like to try both ways and see what suits you better. Like all my other notes these are just suggestions of things that I find easier and have discovered over many years of quilting, it’s not gospel and you don’t have to treat it as such. Find what is comfortable for you and your machine.
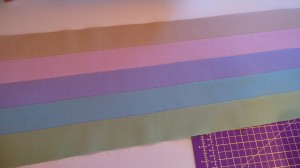
Continuing adding your strips, keeping them in order and making sure that you are sewing so that the seams are all on the same side. Always start from the same edge.
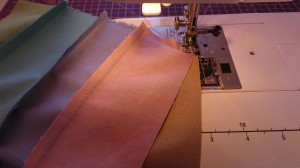
Once you have joined the 5 strips, press the seams in one direction.
You may notice that the strips are not all the same length.
This is fairly common and is a manufacturing issue and a washing issue. It’s not something that can be fixed. But if you always start from the same edge when joining strips you will reduce the waste of fabric.
Trim the selvedges off the edge that you started piecing on.
Then cut your pieced unit into four 10 1/2in blocks.
Repeat for your other sets of strips and you have made all of your blocks.
In the next blog post we will be cutting the focal piece, adding a small border, assembling the quilt top and preparing for quilting.
So this quilt-along will be a little different to your usual type of quilting instructions. Mainly because I’m letting Mum take the lead on this one. It’s her quilt and her learning pace, so there’s no rushing and no set timeframe.
Mum works from home for the most part of the week, working in our shared space, the craft room/office. As it’s on the top floor of the house it does get a bit warm but when the sun is around the back of the house first thing in the morning it is quite chilly. Mum decided she wanted to try and make a quilt for herself. Something small enough that she can give it a go without being too overwhelmed with its size, but big enough to drape over her legs while she works on the computer.
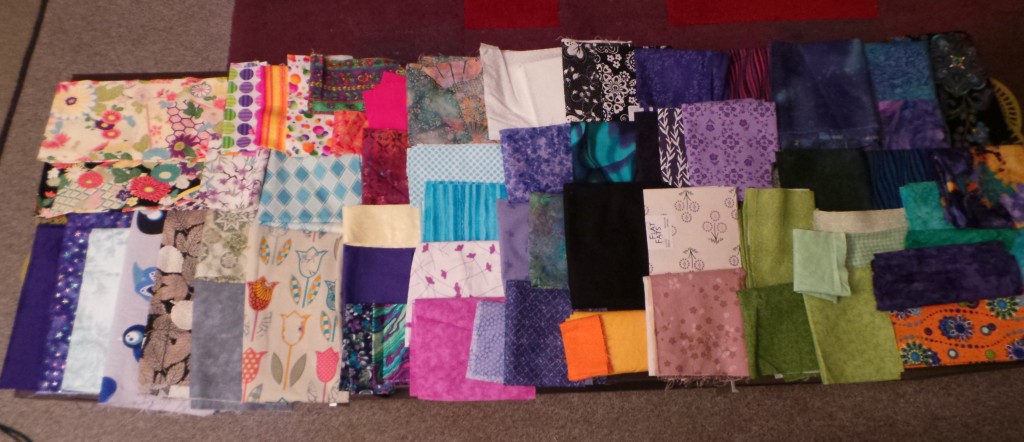
So the other night while we watched CSI (Saturday Crime Night) we pulled out every piece of fabric that Mum owns. Which was not a lot as she’s not really a sewer to the extent I am (read craft hoarder), she used to dabble when my sister and I were little but she mainly painted ceramics and now does cake decorating and some knitting.
Having helped quilters choose fabrics for almost a decade I have created my own process when working with customers who struggle with fabric choice – getting them to tell me little things about the fabrics they’ve chosen so I can work my way through their selections and help nudge them in the right direction – whether that direction be a complete selection or a partial one with more things to find later – and then get the fabrics to speak its design to us.
So Mum’s fabrics were a bit random to say the least. She had a few themes which she’s picked up on but generally it wasn’t a cohesive group of fabrics. We started by dividing them into what groups we could see – blenders, black and whites, brights, small prints (mainly tone-on-tones) and miscellaneous. We also matched up fabrics that worked together, hoping that as we worked through the pile we would find something or enough little somethings that would spark an idea.
Once everything was sorted we stepped back and looked at what we’d done. Mum couldn’t quite see where I was going, she wasn’t really even clear with herself about what she wanted and was concerned that her random fabric purchases and mini raids on my stash had left her with a pile that couldn’t be used.
Which is never the case. Because stash diving gives you the opportunity to see what you have (and how much of it), which means you can then either use what you have buying only a few bits to add in or you can see you have nothing that works and buy from scratch. Both are equally good but it all boils down to the timing, the project and your budget.
So I made her pick up the two fabrics that spoke to her the most and explain why they spoke to her.
The first one she finds calming, the softer colour palette is peaceful and contains her favourite colours. It’s not too bold but it’s still an interesting print.
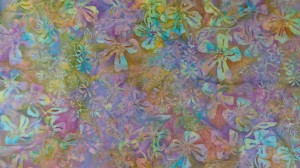
The second one reminds her of a storm – the turbulent nature of it, the depth of colours in it and the movement in the print. She loves the strength in the colours but was concerned about matching them.
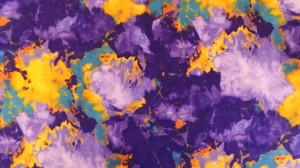
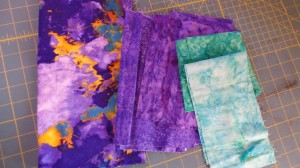
So we went through the shop’s stock, our local Spotlight and my stash. After trying to match the storm print and coming up with very little that Mum felt matched the vibrancy of the fabric, we ended up with the batik fat quarter and a handful of soft homespuns in matching tones.
The design of the quilt also went through several permutations. Starting with the fact that Mum didn’t want to chop up the fat quarter too much and lose the impact of it. We sketched a few ideas, thinking that we were using the storm print. Mum thought about creating a window effect so that we’d be looking out the window at the storm – cutting it up into four squares to make the window panes – but then we were a tad trapped with that design, not having fabric to see how we could expand on the quilt into the border made it difficult. We thought about doing a colour wash – pulling the four main colours from the storm FQ and working with colour gradation, piecing blocks to surround the FQ, possibly edging it with a narrow border of black to frame it and contrast with it, but it all felt a little off so we changed plans. Again.
Because homespuns are a flat, solid colour you don’t want to use them as a large expanse (unless you plan on machine quilting it with detail, like many Modern quilters do), so for Mum’s quilt we decided on strip piecing blocks and as yet we have yet to decide on the width of the strips and in what direction they will go for each block.
Mum’s quilt is a simple layout. The FQ in the centre, trimmed to a square, with a narrow sashing, the 12 pieced blocks surrounding it, a second sashing and then a border.
Materials list for those who’d like to quilt along:
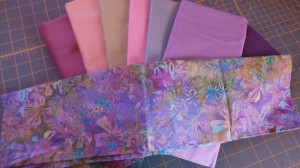
One feature fat quarter – a print that you can pull the other fabrics from
50cm each of 5 co-ordinating fabrics
2.5m of your border fabric (50cm of this will potentially go with the other five 50cm pieces)
60cm of your binding fabric (we have 4 FQs of this colour for Mum’s quilt)
Backing: will be pieced from remaining fabrics with anything extra needed purchased when we get to that stage
Wadding: this quilt’s estimated size will finish at 1.5m square so you can either purchase a 1.7m square of backing (enough for professional quilting needs) or make up a piece using any scraps of wadding you have in your stash.
Tools:
Sewing machine with 1/4in and walking feet
Rotary cutter, ruler and cutting mat
Neutral thread for piecing
General sewing supplies: pins, scissors, marking pens etc
Note: Mum and I have over estimated on fabrics as I roughly calculated she needed about 30cm of each. As we were buying homespun which is generally anywhere from $5 – $10 per metre it was a more economical way to purchase for this particular quilt. If you would like more accurate quantities please hold off on your purchasing until the next post.
So now that we have all the fabrics and the design set what’s next?
Wash all your fabrics. I’ve discussed this before in this post and this is the only part of this whole process where it is up to you.
Then iron and if you like starch them to return them to pre-washed condition which makes for easier cutting. Purchase starch here.
Note: When you wash fabrics there will be fraying. You will lose some off your edges and be required to straighten them cutting into the amount of fabric needed for your quilt. BUY extra if you feel you will lose too much – 5cm extra purchased can save a whole heap of grief when cutting after washing. This is also spoken about in the washing blog post.
Once you have everything washed and ironed and ready to go meet back here for the second instalment of Quilting Along with Mum.
If you have any questions – such as fabrics choice issues – please feel free to post a photo or video of your dilemma and I’ll help you with that part of the process. You can also email me frankensteinsfabrics@hotmail.com.
I am not a morning person and will probably never be one. Ever.
Sure I can get into the routine of getting up and going to work, and maintain such a routine but I don’t like it and it has repercussions on my mind and body. When I’m up early (early for me anyway) I actually feel ill. Eating before 10am is a problem because my stomach hasn’t caught up with the rest of my body being awake and just can’t process anything. I’m no good mentally until midday without coffee or a can of some sticky stimulant drink (and that has its own issues). So I crave a life that lets me be free to wander nocturnally and still pay the bills.
I am at my most creative in the dark. In the middle of the night when the world is asleep, the cars have stopped rushing past my bedroom window and silence descends upon everything the darkness touches, I am awake and ready to design, create and make. I’ve never really understood why this is the way my brain works but have just accepted it and moved on. I have read a few things about creative types being more likely to be up all hours so there must be something scientific and chemical behind it.
I like being awake when no-one else is. It’s soothing to me for some reason, I get more done and there are no distractions. The down side for me is that I can’t run my machine at all hours of the night because it is noisy. So I spend the time drawing new designs, writing patterns and cutting up the next quilt. I love to do all the little ‘process’ jobs that come before the actually assembly of a quilt at night. These smaller steps are the ones that many struggle with – first concept through to execution – because getting started is hard. So for me its easier to do at the best time for me, at night, opening my mind to the quiet of the world and just let the inspiration pour through me.
Daylight hours are for work. The hard stuff, the physical, the things that need to be seen clearly and with lots of light shining on every detail. Night is for freedom of thought, dreaming and wondering what if.
The past couple of nights have been late ones for me going to bed well after 2am. I spend some time in my office, sketching and colouring in, dreaming up all sorts of things. Then I head to bed and read for a little while and then when the burn starts in my eyes I sleep.
I’m in the middle of lots of magazine commissions – quilts, wall hangings, table runners, softies and a bit of jewellery. So sketching is a great way for me to get the designs out of my head and tweak them as needed. Nothing works better than graph paper and a pencil, with a really good eraser and a ruler. I keep my set of colouring pencils handy for when I design things with lots of fabrics that way I can mark out each fabric with a colour and get a better view of what I’m thinking. Drawing these things helps me to clarify my design. Even though I have already visualised the finished project in my mind I work backwards deconstructing the piece into its components and then I can work out how to rebuild it and write notes for it so you can make your own versions.
My world is full of colour. I love it, dream it, mix it and match it. My bedroom and craft room are full of colourful clutter because that is what inspires me. I could never design in an office that was all white, with clean lines and everything in its place and so very neat. My design method is entropic. Chaos and colour all rolled into one brain. I wouldn’t have it any other way.
Many people ask me how I come up with so many things all the time. My answer is because my brain never stops. I walk around like a normal person all the while my brain is chugging along at the back designing, calculating and dreaming up new things. I can be having a conversation with someone and can literally feel my brain working in the background. If I stopped I think my world would stop, my life would stop and I wouldn’t be me.
I wouldn’t have my creativity any other way. I enjoy what I do, it makes me who I am and it makes me happy. I am so grateful to have found my life’s passion at such an early stage in my life.
How do you create? Design? Are you a morning or night person
Before Christmas and at the moment I’m going through times where I just cannot sleep.
I’m not stressed or restless, occasionally I’m awake from the heat but most of the time its just an inability to fall asleep.
It takes a lot out of a person when you can’t sleep – as sleep deprivation is akin to being drunk – but in saying that I seem to have more motivation in the early hours of the morning more so than I do during the day.
Sleep normally comes naturally to me and I am a good sleeper – head hits the pillow and I’m out and nothing will wake me for 8-9 hours. I like sleep, I like my bed and my pillow and I enjoy the haven I’ve created in my room yet I have these batches of time where sleep eludes me. I’ve tried all sorts of remedies and short of taking heavy duty sleeping pills which I am not comfortable doing I really have no answer.
But when I do have these periods of non-sleep I get stuff done.
I built the 55 Fox Fiasco site one night, was up till 3am tweaking widgets and adjusting the colour scheme, building pages and creating the bios for the team, writing text for all the info pages. I’ve added things since but the bones of the site was easy for the girls and I almost straight away. It felt good to achieve something so tangible in one go.
The biggest problem with not sleeping is that the next day I feel terrible and it does take some time for my sewing mojo to get back into the swing of things. But once I’m moving things happen. I also get more headaches and generally feel pretty crazy.
When I do sleep in these sorts of times I have very vivid dreams and this is where I get a lot of my inspiration from. The almost hallucinatory state I’m in creates a world of colour and pattern that runs through my mind and allows me to draw upon in in my waking hours for matching and designing.
So in a way I’m thankful that I can’t sleep right now. That I know that I will be awake for another 2 hours at least before I drift off… because I get something useful out of it that makes the struggle to nod off worthwhile.
I know that I am not a true insomniac and I would never claim to be one (I’ve lived with one, I know how awful it can be) but I do believe that we all suffer it to some degree. Everyone will have an off night every now and then, maybe a few nights in a row. I have around 5-6 weeks. I think its a cycle of some kind that my body goes through – like a snake sheds its skin. I don’t know why it happens, it doesn’t change anything for me other than I’m tired (more than normal) and I get more stuff done. So I grin and bear it and know there is an end to it.
Image via Pinterest
Image via Pinterest
Image via Pinterest
Do you suffer from something similar? Does it affect your creative skills in any way?